Friday, November 19, 2010

Enameling (a quick look)

My mom is a silversmith, metalsmith, enameler and jeweler and I am her apprentice. Our most recent adventure is enameling. It's hard to get the word out that we make all of our items by hand. So I thought I would show the quick version of how enameling works!


So this is a red bow that I made for the holiday season! 

Step 1: Trace the bow onto the copper with a sharpie.


 Step 2:  Cut the bow out with a saw.


Step 3: Clean the heck out of the metal with a glass brush and pumice powder.


 Step 4: Using a paint brush, put the "glue" on the metal. It's actually called Klyr Fire.


Step 5: Sift the glass powder onto the metal.  We use a mask to protect our lungs from the powder that gets in the air from sifting. Breathing in glass is not a good idea! It causes asthma and can eventually cause bleeding!! YUK! Ok, total buzz kill, but we do need to be careful!  If you decide to try this it's important to know safety precautions!


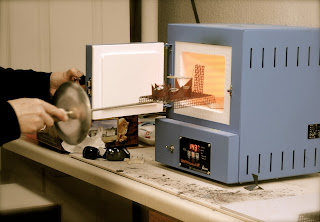
Step 6: Put in a kiln at 1600 degrees. We also use UV protective glasses to prevent eye damage from the heat rods inside the kiln.


 Leave it in for 2 minutes


Take it out!


So, this is not the entire instructions for enameling. There are a lot of in between steps that I skipped to keep this blog post short! Enameling is fun but time consuming.

  
Here are some other things that I have done. Well, I can't say that I actually finish them. I start them, cut them out and put the first coat of enamel on, but it takes a couple coats, cleaning, and fixing stilt marks and..... My mom does the rest. 

  
This bird was the first thing I made from start to finish! It's still my favorite.


I also love my Skully Roger. I just sold this nugget, but I'll have to make another!!


Thursday, November 11, 2010

Quick Coffee Cup Cozy

I love Peppermint Mocha's from Starbucks! Possibly addicted to them. I was looking at the cardboard cozy that I got with my drink and decided to make one.


I traced the cozy onto paper and added a 1/2 inch seam allowance.


Cut out my pattern then traced it onto the front fabric, back fabric and the lining. 


After sewing it wrong the first time, I realized the batting had to be on the bottom and the two fabrics above, right sides together. I used thin tracing paper on the bottom because the batting was getting caught up. It rips off real easy.


Reversed,ironed and top stitched the whole thing. I also added a loop to go around the button on one edge.

I added a vintage button and was done! I love easy projects like this. Makes me feel like I actually accomplished something today!!


Thanks, Patty, for this super cute fabric!!
 

Tuesday, November 9, 2010

Organza & Jewelry

 I've been really diggin this new style of adding random fabrics to your jewelry. I LOVE FABRIC! So, of course I'm going to love them, right? Organza is a great fabric to add -  it's light weight and comes in so many colors.

I used sterling silver chain but any type of chain will do. If you have some old chains or necklaces, you can add them together to make this style of necklace.


I had a string of black onyx that I "obtained" from my mother! They've been in a drawer for the last 5 years, she wont miss them. The chain on the other hand, she was reluctant to give up. I cut some long pieces of organza and used beading string to put it all together.


Start by stringing the first half of the necklace. 


I accordioned the strip of organza and inserted the larger black onyx bead in the center, making sure to center the organza and the bead when stringing.


String it through and do it again!


Knot a ring to both ends. Double or tripple knot it. Make sure the ring is solid all the way around so the string won't slip out. If you use an open ring try super gluing it in place. If you get glue stuck to your hands, I will have a tutorial on how to remove it soon! ;)


Once you have the chain you want to use (I used two different types) lay it out on a flat surface with the ends even together. Use rings to attach the beaded section to the chain. Attach the second chain above that one. Be sure that they don't all hang at the same length!


I attached a bow on the side. I thought it was cute!!


I know you can't really see the black onyx part of the necklace, but it's there!

Thursday, November 4, 2010

GLITTER!!!!!

Ok, so I know it's not Halloween anymore, but I thought I would post this anyway!

I got a HUGE thing of glitter last month and was really excited to glitter something! So I downloaded one of the Martha Stewart Halloween sheets and printed them out.


I also had some press board from some old projects laying around. I traced the images with white charcoal so I could see the outline. I then took them to the band saw! So much easier then trying to cut the whole thing out with an Xacto knife or scissors.


Grab a spongy brush and some glue. This Tacky glue is SERIOUSLY TACKY! And that is a good thing! I love this glue!


Spread a generous amount of glue on the press board.


Sprinkle the glitter on and press it down. Then shift off the excess on to a sheet of paper or a paper plate. Something that is big enough to hold the extra glitter so you can reuse it.


Do one side at time and let it dry completely before you glitter the other side. I put wax paper down and used weights to flatten the glitter. 


I hung the cat on the chandelier and added black tulle bows at the top of each light.


Here are some other things I did for Halloween...

This was a huge piece of press board I had in the garage. I used a ceiling paint for the base coat and Velspar black for the bird and frame. I added a feather boa and tea lights to the mantel. (the tea lights were battery powered)

 For this banner I used black card stock, a few different prints or scrapbook paper, eyelets and ribbon.


I cut the edges of the black circles with scalloped scissors and glued the smaller circles on top. Then painted the letters on with black paint. I used a stencil and sponged on the paint. Punched two eyelets on each letter and weaved in the ribbon. I finished it off with thick tulle bows.


These were two small wine bottles. I removed the labels and added new "XXX" labels. I drenched them in tea water and burned the edges to give it an old/antiqued look.

Next up: Thanksgiving coffee filter wreath. (I hope)